[Canvasio3DPro templateID=”9″ objectID=”6″]
Southern Machinery provides professional SMT peripheral equipment

3D viewing How Cut and Clinching in THT PCB assembly
[Canvasio3DPro templateID=”1″ objectID=”1″][/Canvasio3DPro]
3D to show how SMT machine works
[Canvasio3DPro templateID=”7″ objectID=”5″][/Canvasio3DPro]
[Canvasio3DPro templateID=”6″ objectID=”4″][/Canvasio3DPro]
[Canvasio3DPro templateID=”5″ objectID=”3″][/Canvasio3DPro]
[Canvasio3DPro templateID=”8″ objectID=”1″][/Canvasio3DPro]
How to invest LCD TV Final Assembly factory
Volume Requirements
- Total estimated time to complete weekly- production volumes with proposed equipment set = 160 hours/per week (+/- 10%)
Notes:
- Available time is 80 hours (16hours x 5days)!
- Factory efficiency not optimum due to:
- Weekly Scheduling
- Bottle Neck is SM Lines (Top/Bottom)
- Occupation of Lines, High Volume PC’s
- For schedule improvements we propose:
- To add and reconfigure SMT lines, create dedicated HV PC & PC Monitor SM lines
- Increase inventory, make longer runs, increase weekly batches, warming up Factory
IM Lines

- Number of Lines : 3
- Machine Set: Radial S-3000 x 3, Axial S-4000 x 3
- Cycle time: Average 15 seconds
- Intrinsic Availability: 90%
- Mean Time To Repair: 120 seconds
SM Lines
- Number of Lines : 4
- Machine Set: High Speed Chip mounter x 2, IC mounter x 1
- Cycle time: between 12.60 & 25.29 seconds
- Intrinsic Availability: 90%
- Mean Time To Repair: 120 seconds

MI Lines
- Number of Lines : 4
- Machine Set:
- 10 x Assembly stations,each line
- Delta 5 Wave Solder, each line
- 4 x Test & Inspect stations, each line
- Average Cycle Time: 25 seconds

LCD TV FA Lines
- Number of Lines : 2
- Machine Set:
- 16 x Assembly stations
- 3 x L-Shape Soak System 30 min
- Simulation Soak is 30 min with 30 stations x 3
- Final QC/Test and Pack Out, 3 stations
- Two identical Lines (19” to 42”) for optimum Efficiency & Flexibility
- Average Cycle Time: 24 seconds/station


THT Thriving in Specialized Music Industry
THT Thriving in the Pro-Audio Industry
NAMM Show 2017

While in attendance at the 2017 National Association of Music Merchants (NAMM) Show last month we found one thing to be true… THT Equipment is far from dead. The music industry continues to require robust and durable components for high quality and heavy duty gear. GEAR, GEAR, GEAR! And the better the gear the more likely THT was involved in the assembly. Proving that THT is not just surviving but thriving in our high-tech world.
But there are many missing links! Many of these specialty components are still placed by hand and many more are still IMPORTED. Opportunities abound for manufacturers to bring all assembly, quality control, and profits back home. Quality is the name of the game when it comes to being #1 in any product category but costs sometimes hold back some manufacturers. According to Joel Menchey, Menchey Music Service, import costs for audio manufacturers are the highest of all costs. This doesn’t have to be so.
We at Southern Machinery have the solutions to lower costs and improve your manufacturing assembly quality! Our S-600-OF Through-hole & Surface Mounting Multifunction Machine paves the way to incorporate THT with SMT technologies. We can help you design the exact machine for your needs, ordered to spec. It’s a simple conversation for a huge shift in ideology and savings.
[su_button url=”mailto: info@smthelp.net” background=”#00a3b3″ size=”5″]CLICK HERE for more HELP with your THT Equipment![/su_button]

FEATURES:
- Six pick-up heads.
- Practical placement speed to 18,000 cph.
- Huge Component Range: places SMDs from 0402 to 15 mm x 15 mm, including resistors, capacitors, inductors, diodes/
audion , IC, SOTs, SOPs, QFPs and CSPs, and THT components. - Feeder racks can accommodate a mix of tape feeders and IC tube/stick feeders or 5 THT components feeder.
- Teaching/fiducial recognition camera for easy programming & operation
- Customized nozzles available.
- Bottom fixed-camera vision system for fast, accurate alignment.
- Ball screw drive and heavy-duty, uni-body construction ensure smooth, high-speed movement and high accuracy and repeatability.
- SMEMA-compatible inline
conveyor.
| SPECIFICATIONS:Placement Specifications | |
| Number of Placement Heads | 6 |
| Maximum Placement Speed | 25,000 cph |
| Average Practical Placement Speed | 18,000 cph |
| Placement Accuracy | ±0.05 (0.002″) |
| Minimum SMD Size | 1.02 mm × 0.51 mm (0.04 in × 0.02 in) |
| Maximum SMD Size | 15 mm × 15 mm × 10 mm (0.59” × 0.59” × 0.39“) |
| Alignment Method | Bottom vision standard |
| Capability for SMDs | LEDs, Resistors, Capacitors, Inductors, Diodes, Audion, |
| Transistors, SOTs, SOPs, QFP,s QFNs, CSPs | |
| Pick Up Specifications | |
| Negative Pressure Detection | Yes |
| Components Shortage Alarm | Yes |
| Board Handling Specifications | |
| Board Loading Method | Inline Conveyor |
| Maximum Board Length | 400 mm (31.5“) standard |
| Maximum Board Width | 360 mm (17.2“) |
| Minimum Board Length | 50 mm (1.97”) |
| Minimum Board Width | 50 mm (1.97”) |
| Board Thickness | 0.5 mm to 3.0 mm (0.02” to 0.12″) |
| Fiducial Recognition/ | Yes |
| Coordinate Correction | |
| Feeder Capacity | |
| Feeder Type | Pneumatic |
| Maximum No. of Feeder Ports | 30 Or 5 THT components Feeders. |
| Tape Feeder Sizes | 8, 12, 16 and 24 mm |
| Programming | |
| Operating System | Windows XP |
| PC, Keyboard, Mouse | Yes |
| Monitor | Flat LCD |
| Programming Camera | Yes |
| Numeric Data Entry | Yes |
| CSV Import | Yes |
| Step and Repeat for Matrix Boards | Yes |
| Mechanical Specifications | |
| X Axis Drive Mechanism | Ball Screw & Linear Guide Rail |
| X Axis Drive Motor | AC Servo |
| Y Axis Drive Mechanism | Ball Screw & Linear Guide Rail |
| Y Axis Drive Motor | AC Servo |
| Conveyor Drive Mechanism | Ball Screw & Linear Guide Rail |
| Conveyor Drive Motor | AC Servo |
| Transmission Drive Mechanism | Belt |
| Transmission Drive Motor | DC Stepper |
| Z Axis Drive Mechanism | Belt |
| Z Axis Drive Motor | DC Stepper |
| X-Y Axis Resolution | 0.005 mm (0.0002“) |
| Z Axis Resolution | 0.005 mm (0.0002“) |
| T Axis Range of Motion | 360° |
| Physical Specifications | |
| Overall Dimensions | 1300 mm x 1380 mm x 1410 mm (51.2” x 54.3” x 55.5“) |
| (L x W x H) | |
| Approximate Net Weight | 1000 Kg |
| Facility Requirements | |
| Standard Voltage | 220 V – Single Phase, 50Hz |
| Air Pressure | 0.6MPa (6.1kgf/cm2) |
| Service and Support | |
| Remote Diagnostics | On-line |
| Warranty | 1 Year |
Ensuring the Best Design for Final PCB Production Stage with Testing!
Ensuring the Best Design for Final PCB Production Stage with Testing! Ensuring the Best Design for Final PCB Production Stage with Testing!
Avoiding Design Mistakes with Testing
Improve EMS Productivity by Testing Early

PC Board errors are a drain to EMS productivity. Through analysis and testing PCBs in the pilot stages, a smoother and more educated production set-up can be achieved. By performing automatic impedance measurements and testing of components (chip resistors and capacitors) early on, you can ensure the best design for production.
We recommend applying the best design logics when creating your PCB layout and Test, Test, Test for maximum efficiency and output. According to Circuits Assembly’s December 2016 Magazine, here is the list of 5 Most Common PCB Design Mistakes: “1. The components do not suit the production technology 2. Thermal imbalance 3. Incompatibility between fabrication and assembly technology 4. Component placement at PCB edge 5. Placing fiducials on the PCB’s edge.”
Once you have planned your PC Board with best practices, Southern Machinery’s High-Speed In-line Circuit Board Test Machine will help with testing by incorporating a visual inspection function which allows mounting status checks on each component (e.g.: typo descriptions in alphanumeric characters, orientation, size) on the operator’s monitor will serve to best analyze testing up close. As well as automatically generating test data from mounting data and component list.


Stop Importing & Start Automating!
Automatic Insertion Equipment Manufacturer for PCB Assembly
Stop Importing Cell Phones, Automate Them!
Times have officially changed. Where once there was no reason to invest in your homegrown cell phone manufacturing, now, with equipment that is more affordable than ever before, it makes sense to invest at home. Cell phone suppliers don’t have to rely on other countries to import cell phones any longer with new Smart Factories that are more efficient and affordable than labored hands. Now, businesses can incorporate manufacturing into their business model, and finally stop importing from China.
The SMT, pick and place Industry has revolutionized the way we used to look at manufacturing. The reasons for importing cell phones from China, namely cost and labor, are being reduced with the advancement of PCB AI Assembly equipment. Now you can home-grow your cell phone manufacturing with equipment that is smarter, faster, efficient, and more affordable than human labor force.
These huge changes will affect all companies that rely on electronics manufactured abroad. These imported items that have been historically low in cost, will no longer have the same low price tag. Intelligent companies are staying ahead of the curve and beginning to create their own reliable manufacturing processes, IN-HOUSE.
The good news is that there are companies that have planned ahead. It is now easier than ever to begin or improve your own manufacturing capabilities. It is not the huge undertaking it once was to establish and expand your own manufacturing equipment. PCB AI Assembly equipment is smarter, faster, efficient, and more affordable than ever before. Now is the time to get on board!
We have your solution! Become an Industry Leader!


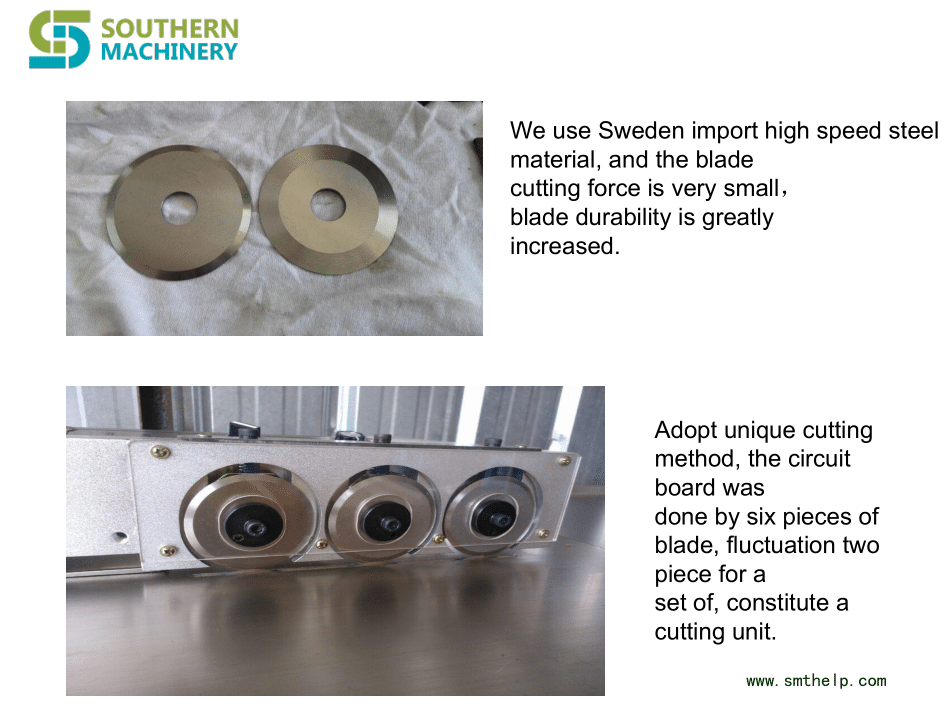
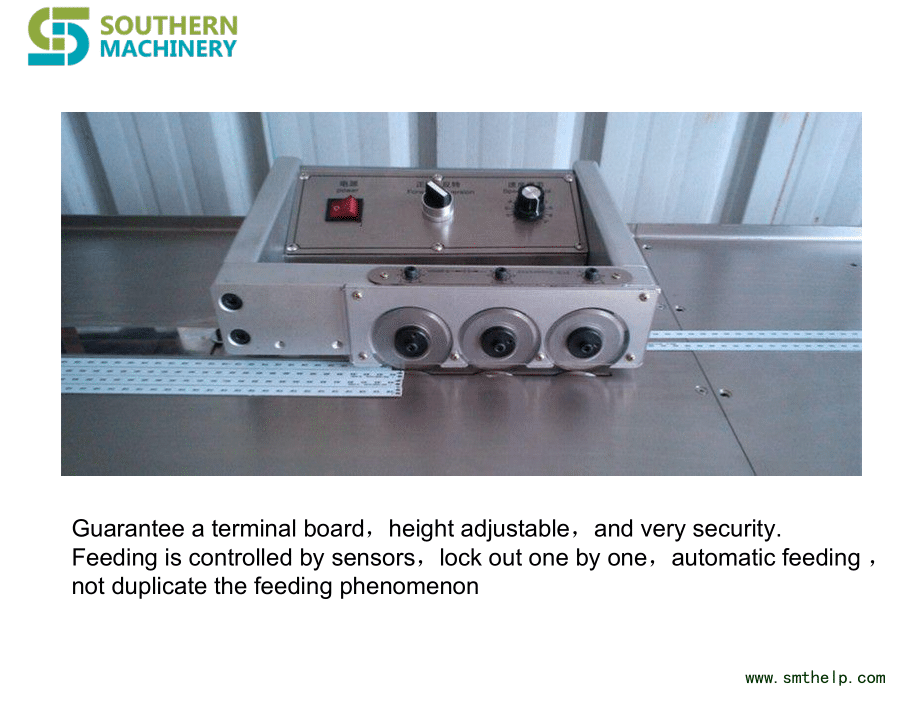
The following machine is for the separator of the aluminum LED Lamp plate.
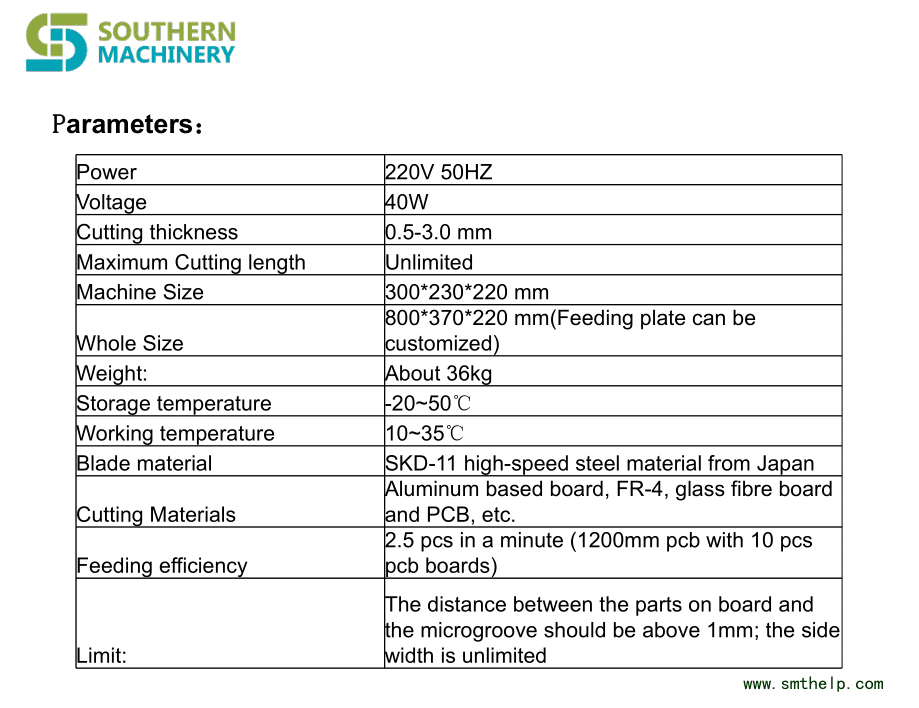
S-D601 aluminum LED lamp plate separator machine
Machine introduction:

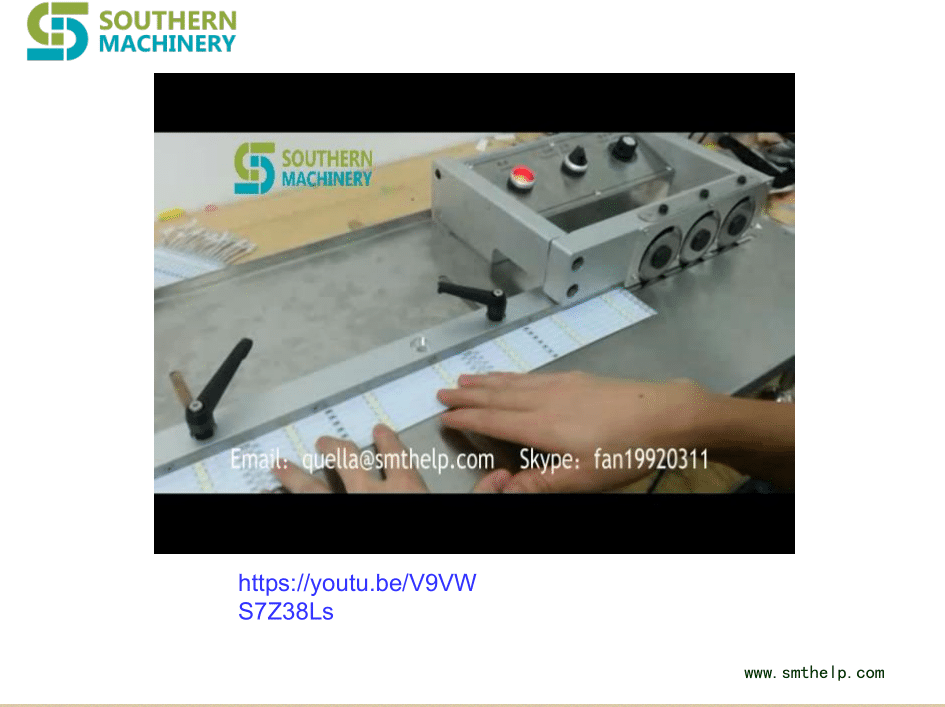

Youtube vedio:
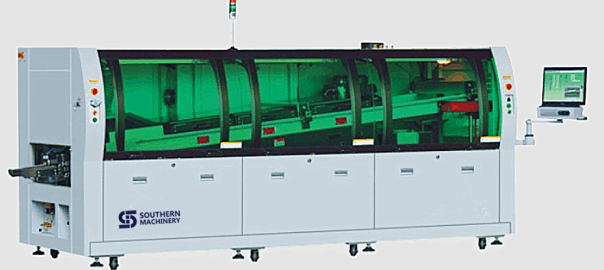
Welcome home — Shenzhou XI and Congratulations on Southern Machinery’s Wave Soldering machine successful ship out to overseas
Today, the Shenzhou XI spaceship will come back to the Earth after a monthlong mission in the space.
Find below video channel and know how China made SMT AI machine.
1,SMT pcb assembly LED
https://www.youtube.com/channel/UClX0iEG2bvJq8yUBEDamgDw
2, Through hole technilogy
https://www.youtube.com/channel/UC6Pj74wjjEjtp-jneRoSL9Q
3,SMT Machine For PCB Assembly
https://www.youtube.com/channel/UCke0s_OM0eKflD8WmGSLm5A
4,Odd Form Insertion Machine/Feeder
https://www.youtube.com/channel/UCactVXP8IrU3l-vItOODRCA
https://www.youtube.com/channel/UCMuFHjsSuaIXnc3_3yNcwzw
6, Stencil Cleaner Machine Southern Machinery
https://www.youtube.com/channel/UCnMRyXlBFqJZHYuqaZVoK4Q
7, LED Mounter
https://www.youtube.com/channel/UC4Z_P3S6qAYLHnlE-DU2OSA




UIC SMT machine PEC Camera Assembly – T50319001 Rev
| Beam 2 FW PEC Camera Assembly – T50319001 Rev. K |
| This Document Supports Assembly 50319001 Rev. G |

Replace the PEC Camera Assembly
If the PEC Camera Assembly is damaged or experiences an electrical or optical failure, the camera must be replaced.
|
|
CAUTION |
| Use caution when handling the PEC Camera and Lighting Assemblies. These assemblies are very sensitive to sudden shock. Also use ESD precautionary measures when handling the PEC Camera and Lighting Assemblies. A properly grounded ESD wrist strap is recommended. |

Prerequisites
Make sure that the following items are available before beginning the procedure:
- A new PEC Camera Assembly
- A calibration kit and a new PEC gray card
Remove the PEC Camera Assembly
To remove the faulty PEC Camera Assembly from the head cage, perform the following procedure:
-
Power down the machine and perform Lockout/Tagout according to local procedures.
|
|
WARNING – LOCKOUT/TAGOUT |
| The machine must be powered down and your site’s Lockout/Tagout procedure executed during this procedure to ensure personal safety. |

- Open the access cover.
- Move the beam to a location where the PEC camera can be easily accessed.
- Disconnect the PEC_VIDEO/PWRPL and PEC_LED_CTRPL cables from the Head Cage Interface PCA.
- Remove all cable ties securing the PEC camera cables to the head cage.
- Remove the PEC camera cables from the cable clamps on the bottom of the head cage.
- Remove the screws that secure the PEC lighting to the PEC camera. Let the lighting hang loose from the hole in the carriage plate.

- Disconnect the PEC lighting cable from the PEC lighting. Set aside the PEC lighting.
- Remove the screws that secure the PEC camera to the carriage plate.
- Lift the PEC camera out of the head cage and discard.

Remove/Install the PEC Camera Assembly
If the PEC Camera Assembly is damaged or experiences an electrical or optical failure, the camera must be replaced.
|
|
CAUTION |
| Use caution when handling the PEC Camera and Lighting Assemblies. These assemblies are very sensitive to sudden shock. Also use ESD precautionary measures when handling the PEC Camera and Lighting Assemblies. A properly grounded ESD wrist strap is recommended. |

Prerequisites
Make sure that the following items are available before beginning the procedure:
- A new PEC Camera Assembly
- A calibration kit and a clean, undamaged PEC gray card
Remove the PEC Camera Assembly
To remove the faulty PEC Camera Assembly from the head cage, perform the following procedure:
-
Power down the machine and perform Lockout/Tagout according to local procedures.
|
|
WARNING – LOCKOUT/TAGOUT |
| The machine must be powered down and your site’s Lockout/Tagout procedure executed during this procedure to ensure personal safety. |

- Open the access cover.
- Move the beam to a location where the PEC camera can be easily accessed.
- Disconnect the camera control/interface cables from the Head Cage Interface PCA.
- Remove all cable ties securing the PEC camera cables to the head cage.
- Remove the PEC camera cables from the cable clamps on the bottom of the head cage.
-
Remove the screws that secure the PEC lighting to the PEC camera. Let the lighting hang loose from the hole in the carriage plate.
(Typical PEC Camera and old-style mount shown below)
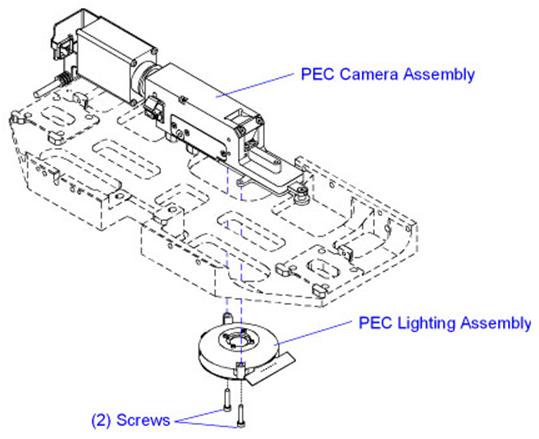
(New-style PEC mount shown below)

- Disconnect the PEC lighting cable from the PEC lighting. Set aside the PEC lighting.
- Remove the screws that secure the PEC camera to the carriage plate or mounting block.
- Carefully remove the PEC from the head cage.
- If installing a camera with a different magnification, remove the 6 frame fiducial inserts on the feeder uprights and the 4 nozzle changer fiducials on the nozzle changer. Retain for use with the .4 MPP PEC camera.
For UPS+ 7.5SC and higher with a .4 MPP PEC camera: Remove the 6 frame fiducial inserts on the feeder uprights; they will not be re-installed.
Install the PEC Camera Assembly
To install the PEC Camera Assembly, perform the following procedure:
- Carefully move the PEC camera into the head cage and position on the alignment pins.
- Apply Loctite 222 to the PEC camera mounting screws.
- Install the PEC camera mounting screws and torque to 1,36 Nm (12.0 in-lb.).
- Connect the PEC lighting cable to the PEC lighting.
- Install the PEC lighting to the new PEC camera and secure with the screws removed earlier.
- Route the PEC cables through the cable clamps on the bottom of the head cage.
- Connect the camera control/interface cables to the Head Cage Interface PCA.
- Install new cable ties to secure the PEC cables to the head cage. Do not over-tighten the cable ties.
- If installing a .4 MPP PEC camera where one did not exist previously, install the 6 frame fiducial inserts on the feeder uprights and the 4 nozzle changer fiducials on the nozzle changer. Install over the existing fiducials.
For UPS+ 7.5SC and higher with a .4 MPP PEC camera: Do not install the 6 frame fiducial inserts on the feeder uprights.
- Close the access cover.
- Power up the machine.
-
Determine if the machine is equipped with the Cognex Vision system:
- Open Diagnostics II.
- Select Version Information > Hardware Options > Vision Systems.
- Open Diagnostics II.
|
If Cognex Vision is… |
Then… |
| On the machine | Continue with the next step. |
| Not on the machine | Do the following:
|
- Calibrate the PEC camera and lighting. For instructions, see the PEC Calibration: Camera and Lighting (Multifunction Machines) help topic in Voyager.
PEC Camera Polarizing Components
The PEC camera consists of two elements: a rotating polarizer that covers four of the eight illumination petals and a sliding polarizer. The sliding polarizer is located in the camera aperture. The axis of this polarizer, frequently referred to as the “analyzer”, is orthogonal to that of the rotating polarizer. The combination of these polarizers on the module results in cross-polarized illumination.

(Typical PEC Camera shown)
The rotating polarizer ensures that the substrate is illuminated with linear polarized light. The metal features and ceramic background reflect polarized light differently. The light reflected from the metal has no net change in polarization. Because the orientation of the sliding polarizer located in the camera aperture is orthogonal to that of the rotating polarizer, most of the light reflected from metal features is blocked. Therefore, metal features appear dark on the camera.
In contrast, the ceramic surrounding the metal features randomizes the polarization upon reflection. Because the polarization is randomized, a portion of the reflected light can pass through the central polarizer and reach the camera. Therefore, the ceramic background appears as a shade of gray.
The following table summarizes the polarization effects on metals and ceramics:
|
Material |
Incident Polarization |
Reflected Polarization |
Central Polarizer Orientation |
Intensity at Camera |
|
Metal |
|
|
|
|
|
Ceramic |
|
|
|
|


Polarized Lighting Zones
The PEC Lighting Assembly has two lighting zones. Which zones are used for imaging depends on the type of substrate being imaged. The two lighting zones are shown in the table below.
|
Lighting Zone |
LED Color |
Graphic |
|
Zone I |
Blue |
|
|
Zone II |
Red |
|


Petal Zones I and II each contain four illumination petals positioned at 90 degrees to each other. The illustration below shows how the Red (R) and Blue (B) LEDs are oriented.
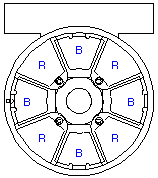
Selectable Polarizer Positions
The PEC Lighting Assembly is equipped with a rotating polarizing filter and high intensity LEDs. The PEC camera has a polarizing film mounted within a rotating ring and a second polarizer mounted on a slide above the lighting module. Certain classes of flexible circuits image well with cross-polarized illumination. For the polarized option, it is recommended that the central polarizer be left in place.
- The blue lighting zone of the PEC Lighting Assembly is designed to image flexible circuits.
- The red lighting zone of the PEC Lighting Assembly is designed to image ceramic circuits.
The following table summarizes the available Polarized lighting options:
|
Lighting Zone |
Graphic |
Function |
|
Zone I |
|
Orienting the rotating polarizer above the blue LEDs allows non-polarized illumination from the Red LEDs. This lighting type is effective on dark-colored ceramics. |
|
Zone II |
|
Orienting the rotating polarizer located above the red LEDs allows polarized illumination from the Red LEDs. This lighting type is effective on white or light-colored ceramics. |


How to use Solder Preforms to improve your Electronic Product Quality
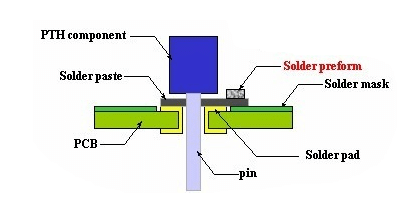
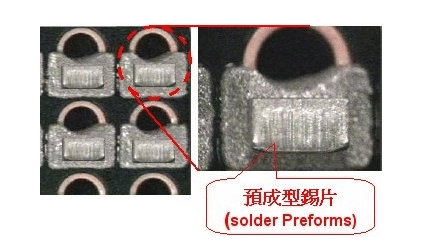
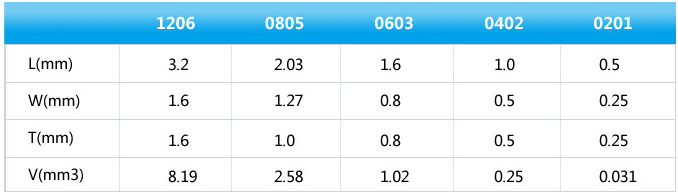
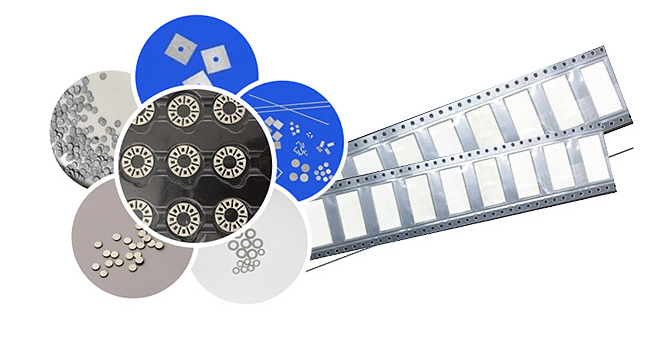
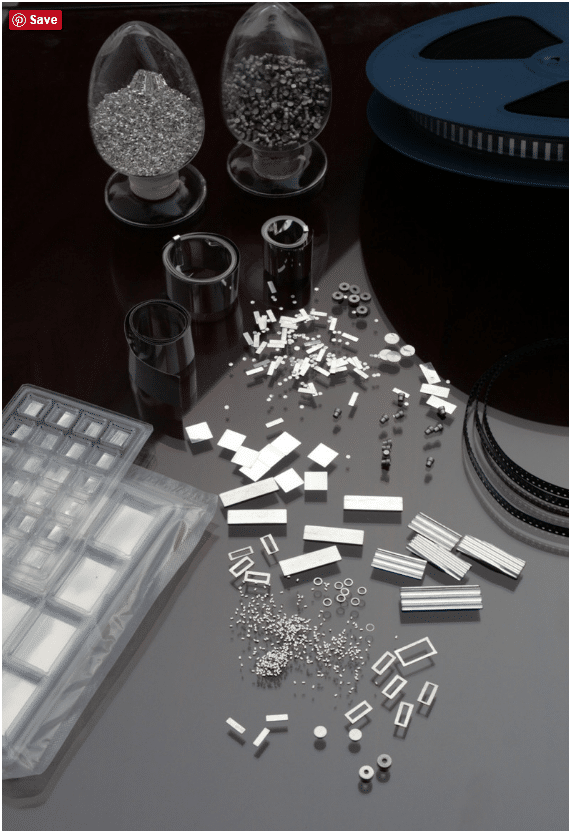
Solder Preforms are used in a variety of applications that require precise amounts of solder. Preforms come in standard shapes such as squares, rectangles, washers and discs. Typical sizes range from .010″ (.254mm) up to 2″ (50.8mm). Smaller and larger sizes, as well as custom shapes, are also available. Dimensions can be held to tight tolerances to assure volume accuracy.
- Increased solder volume
- Improved drop test results
- Fewer issues with flux residue
- Reduced rework
- Improved fillet shape and volume
How to improve SMT PCB assembly quality
MISPRINT CLEANING
INTRODUCTION
Assemblers surveyed report that cleaning misprinted circuit assemblies is a production gap that has not been adequately addressed. Traditionally, the industry has used stencil cleaning agents and equipment to address this rework need. One of the benefits of cleaning misprinted assemblies with the stencil cleaning process is the ability to collect and filter wet solder paste. The major short coming of cleaning misprints within stencil cleaning processes is the inability to remove B-side reflow flux residues from both the surface and under bottom termination components.
REWORKING/CLEANING MISPRINTED ASSEMBLIES
Stencil printing is a highly automated process. During machine setup, a small group of boards are misprinted. During production stencil printing, circuit boards are periodically misprinted due to clogged apertures, stencil out of alignment, solder paste rheology shifts and other issues. Stencil misprints are defined as A-Side (Initial print out of alignment with no components previously placed) and B-Side (A-Side was successfully printed and components placed and soldered. The subsequent process of printing the B-Side results in the solder paste being out of alignment resulting in a B-Side misprint).
Printed Circuit Board misprints are a costly problem with no easy rework methodology. Production cleaning processes are normally not used to clean misprint assemblies. Potential quality issues such as:
- Solder balls collecting into the wash tank and being transferred back onto the assembly
- Solder balls migrating into the rinse streams resulting in hazardous waste from metals in the wash and rinse holding tanks
These complexities potentially compromise repeatability and reliability standards. Due to these complex issues, most assembly houses do not allow misprints to be cleaned within their production cleaning process.
Assemblers commonly address the misprint cleaning need by either hand wiping the misprinted side of the circuit card and/or clean the misprint in a stencil cleaning machine. Both methods create the potential for quality issues. First, when wiping solder paste from the misprinted side of the board, solder paste can be trapped in solder mask defined channels, through-hole vias, and other board geometries (Figure 1). Numerous quality problems can result due to lack of control and definition.


Figure 1: Solder Balls Wedged into No Solder Mask Defined Channels and Via Holes
Second, stencil cleaning machines are designed to remove wet solder paste from stencils. Most stencil cleaning processes do not rinse the stencil with water. For those that use a water rinse, the water is reused since trace levels of metals in water prevent disposal to local treatment works. Cleaning a production board in a machine designed to clean stencils fails to meet ionic cleanliness standards required for a production assembly. Additionally, on B-Side misprints, the stencil cleaning agent is typically not adequate for cleaning reflowed flux residues on the A-Side of the board. In most cases, the stencil cleaning agent partially removes the reflowed no-clean flux residue resulting in white residue and an ionically dirty assembly.
FILTRATION OPTIONS
Cleaning the misprinted circuit board within an electronic assembly production cleaning process has the potential to achieve cleaning of wet solder paste and reflowed flux residues as well as meet quality and yield objectives. The problem with cleaning a misprinted circuit board in a production cleaning process is the deposits of solder spheres collected into the wash holding tank. Free solder spheres within the wash holding tank can be picked up by the inlet of the pump and sprayed onto production assemblies. There is also the potential that the solder spheres can be dragged into the rinse sections. Both quality and waste treatment issues result from this practice.
To resolve the quality and water treatment issues, collection and filtration method systems are needed to trap and filter solder spheres. Filtration systems designed tocontain the solder spheres and capture them prevents spraying solder balls through the pump and spray manifolds. The mechanical and filtration systems resolve the issues of redepositing solder balls onto production assemblies and the potential to contaminate rinse streams. The overriding quality advantages in using production cleaning equipment, which is designed for repeatedly removing all solder spheres from the assembly, remove reflowed flux residues and render an ionically clean printed circuit board provide a reproducible and repeatable product.
EQUIPMENT OPTIONS
Inline Cleaning Equipment
Two types of aqueous production machines are used to clean electronic assemblies, inline and batch. For the inline machine, the pre-wash section of the cleaning machine is designed to wet, elevate the circuit board to wash temperature, and soften reflowed flux residues from production circuit assemblies. On option for containing solder balls is to equip the pre-wash sectionwith deflectors that contain the raw solder paste as it is being displaced from the circuit assembly. The deflectors close in the pre-wash spray manifolds using two trays and plates to prevent solder spheres from escaping the housing of the pre-wash section. As the boards enter the pre-wash section, the displaced solder balls and wash fluid drain into the catch trays. By capturing and containing the pre-wash liquid, the majority of the solder balls can be channeled into a series of sluice boxes. This important design feature contains the bulk of the solder balls with a minimal amount escaping to the wash holding tank.


A series of Sluice Boxes can be designed to capture the heavy raw solder spheres similar to the techniques used in mining precious metals from water streams (Figure 5). Three separate sluice boxes capture the majority of the solder paste. Each sluice box is equipped with a wire mesh. The weight of the solder balls drop through the wire mesh and collect into the sluice box trays. The first sluice box captures the majority of the solder spheres with the remaining two sluice boxes used to collect the residual solder spheres.

Figure 3: Sluice Box Collection Boxes courtesy of Speedline Technologies
Solder balls that are not collected within the sluice boxes will drain into the wash fluid holding tank. To prevent these stray solder balls from being sprayed onto circuit boards, three pump intake strainers prevent large spheres from entering the pump (Figure 6). The smaller solder spheres that pass through the strainers will be captured in a bag filter from wash liquid pumped through the outlet of the pump.

Figure 4: Strainers in Suction Inlet of the Wash Holding Tank courtesy of Speedline Technologies
Following the suction strainers, the wash solution is pumped through a filtration system designed to collect any remaining solder spheres before reaching the spray manifolds. The wash outlet enters the top side of the filtration canister, exits the clean side of the filter and then goes to the spray jets.

Figure 7: Filtration Canister
Within the canister, there are internal bars that prevent the bag filter from getting next to the exit side of the filter housing. This design feature prevents back flow or resistance as the liquid pumps through the filter canister. The 10/5 bag filter cartridge (ten microns on the inside and 5 microns on the outside of the filter cartridge) provides double redundancy to contain any solder balls from escaping the filter (Figure 9). The 10 micron side captures the heavy particles and the fine 5 micron side of the filter assures no solder spheres are sprayed onto circuit cards. The filtration design removes solder balls as small as Type 5 Solder Paste while preventing solder balls going to the manifolds. Pressure drops are minimal due to the solder paste being captured within the bag filter. Should the pressure drop, the machine is equipped with a user defined interface, which sends an alarm to the operator. The design is such that thousands of misprint boards could be cleaned before having an impact on the bath integrity, pressure and cleaning performance.
Batch Cleaning Equipment
One main difference between batch cleaning machines versus an in-line type cleaner is the ability to program the type of wash cycle, the sequence, and cycle times within the cleaning process. It is therefore critical that the ability to effectively trap and collect wet solder paste be integrated into the batch cleaner wash cycles.
The design objective is to provide the board assembler the flexibility to deflux their normal production runs (A/ B side), deflux an A-side with B-side misprint, clean A/B side misprint, plus the ability to completely rinse and dry the product within the same batch type cleaner.
Similar to the design for the in-line cleaning system, the same equipment manufacturer used the multi-stage filtration approach to effectively collect solder spheres and to prevent the spheres from being sprayed onto the board assembly. A pre-wash type cycle in the batch cleaning process will wet, elevate the circuit board to wash temperature, and soften the reflowed flux residues from the production circuit assemblies. The flux composition with the raw solder paste is easier to remove than the reflowed paste. An internal bag type filter is used to capture the raw solder paste that is removed during the Flood Wash cycle . The main purpose of the internal bag filter is to minimize the amount of solder paste that would be drained into the wash fluid holding tank.

Figure 8: Bag Filter in Wash Holding Tank
Solder spheres that are not collected in the bag filter will collect in the wash fluid holding tank. To prevent large particles from entering into the wash pumps, two intake strainers are located in the wash holding tank.

Figure 9: Batch Intake Strainers
Following the suction strainers, the wash solution is pumped through a filtration system that is designed to capture the smallest of solder spheres before being sprayed through the wash fluid spray delivery system. The filtration system is designed to capture solder paste as low as type 5 paste (Figure 10).

Figure 10: Batch Filtration Design
SUMMARY
Cleaning both A-Side and B-Side misprints has been a complex problem for assemblers. Using a stencil cleaner to clean misprints has numerous flaws. Two key issues is the inability to remove reflowed flux residues with stencil cleaning agents and poor rinsing. Notwithstanding, most assembly houses do not allow misprints to be cleaned in production cleaning machines due to the risk of contaminating product boards with stray solder balls and due to waste water metal contamination issues.
Collection and filtration systems designed into inline and batch production cleaning equipment safely captures and contains solder spheres from being sprayed onto production assemblies. Additionally, the containment and filtration systems prevent raw solder paste from entering the rinse water streams.
Using a production cleaning machine provides numerous benefits to the assembler.
- Recovery and rework of expensive hardware
- Removal of wet solder paste
- Containment of solder spheres
- Removal of reflowed flux residues
- Exceptional rinsing
- Ionically clean assemblies
- Repeatable
- Reproducible
Wiping wet solder paste from production assemblies is a bad practice. When wiping wet solder paste, solder spheres can be wedged into no solder mask defined troughs, vias and other offsets. When these solder balls become wedged, high levels of energized sprays may not be sufficient in displacing a wedged solder ball.
