描述
System Components:
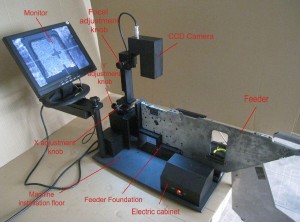
Calibration Jig Base- our base allows CP-4, CP-6, and IP/QP BFC style feeders to be calibrated. This is accomplished by interchanging the sub bases. Calibration Jig Base comes equipped with digital micrometers in the X and Y-axis, allowing the user to identify bent feeder bases in the X-axis, and adjust for the Y-axis pickup point (through the eccentric adjuster screw on the feeder).
How to use the feeder calibration system:
Install the sub-base for the style of feeder you are going to calibrate. For CP4/CP6 style feeders you must slide the sub-base forward to the 1st alignment pin, IP/QP style feeders to the 2nd alignment pin, while keeping the sub-base against the guide on the right side. Once the sub-base is in position, tighten the locking screw. Now that you have the sub-base installed, insert the appropriate master gauge onto the sub-base and focus the tool scope. Next, center the crosshairs on the tool scope to the calibration circle on the master gauge using the micrometers. Once the scope is centered to the gauge, then zero by pressing the zero buttons on the X and Y digital micrometers. Remove the master gauge and you are ready to calibrate feeders.
Install appropriate width steel tape into feeder for calibration, then place the feeder on the sub-base. For CP4/CP6 advance feeder by turning the feeder advancement cam clockwise, IP/QP feeders advance by hand all the way forward. Check the image in the tool scope to verify the hole in the steel tape is centered on the crosshairs. If adjustment is needed, loosen the locknut on the eccentric screw and adjust until the calibration mark is centered in the “Y” direction. If the calibration mark is off center in the “X” direction, move the micrometer until the “X” crosshair is lined up and verify that the micrometer does not read more than +/- 0.25mm. The “X” direction corresponds to a bent feeder body and there is no adjustment to fix this problem. Our specification is 0.25mm. Other specifications may be chosen.
It is suggested that the tool scope be check/verified with the master gauge periodically.
| Specification | |
| Working Voltage | 220V/AC(50Hz) 60W |
| Material | aluminum and iron |
| Air Pressure | 5KG/c㎡ |
| Visual System | 50 times magnification CCD camera |
| Lighting system | Ring the LED lighting |
| Display system | Ultra bright LED color display |
| Feeding control | Precise 8 *2mm /12 *4 mm / 16 * 8mm and 24*8mm feeder control zone |
| Power supply | 220V, 50Hz |
| Machine Size | 350*500*550 mm |
| Weight | 45Kg |
Characteristics:
- The operation is simple, the external appearance is simple and cleverly.
- X, Y, H -three stalks, adoption Japan importing and the high accuracy wheel gear drive, precision and credibility.
- 50X CCD;with LED lighting, appearance clearer.
- Install dynamoelectric, single and continuous strike LEVER, simulate machine action.
- Observing the wheel gear dynamic state step the conditions.
- With standard calibration Ruler to adjust component centeral.
1.Switch on: use the Jig. correct signal wire connects into the display VIDEO plug,confirming power supply, correct connects into the power supply and monitor.
2.Press power switch, the Jig. Press-pole has not original position, will return to original position automatically. The display will show cross cursor, The Jig.
Completed self-check.
3.POWER (ON/OFF) power switch: Use to control machine power switch,
Press ON direction, the machine connects into power supply, pressing OFF
direction, breaking the machine power supply .


评价
目前还没有评价